3 - Uniforms
Chapter 3 - Uniforms
In chapter 3 of the Book of Shaders we are introduced to the concept of uniform input:
Shader pixels are rendered in parallel and each thread is "blind" to the others. To send input to these threads the input must be equal or "uniform" across all threads (and read only). Built-in uniforms exist for things like texture resolution, mouse input, and time.
Here are a few of "uniforms" in WebGL:
uniform vec2 u_resolution- Width and height of the canvas.uniform vec2 u_mouse- Mouse x / y position.uniform float u_time- Time in seconds since the shader loaded.
The names of the built-in uniforms differ across implementations. Here are similar ShaderToy equivalents:
uniform vec3 iResolution- Viewport pixel resolutionuniform vec4 iMouse- Mouse cordinates x/y and left/right mouse clicks z/w.uniform float iTime- Shader playback time in seconds.
Notice that the resolution and mouse uniforms are different dimensions depending on the implementation. This is important to know if you are porting code between implementations.
Check the official GLSL Uniforms Wiki Docs for the nitty-gritty on this variable type.
In ShaderToy the uniforms are available by default, but with WebGL we need to specify them in our code, right after we specify the float precision:
Varying Built-Ins
Along with uniforms there are also built-in varying variables. In the previous chapter we saw the built-in output varying gl_FragColor, an out parameter of type vec4 targetting the RGBA colour of each pixel.
⚠️ Warning: Apparently gl_FragColor is depreciated in current versions of the standard in favour of a manually defined output paramater. We can re-create gl_FragColor like so: layout(location=0) out vec4 gl_FragCoord; Details.
There is also a default output varying in parameter that specifies which x/y/z coordinates of the pixel the shader is working on called gl_FragCoord. The official docs shows its declaration as a 4D input paramater (in vec4 gl_FragCoord ;) defined as (x, y, z, 1/w).
🙋 Question: I've only worked with gl_FragCoord so far in two dimensions gl_FragCoord.xy. What does it mean for a shader to have a z-index depth? And what the heck is 1/w?
Building a Colour Gradient Shader
Let create a Shader using the shader pixel varying out parameter gl_FragColor and the shader position varying out parameter gl_FragCoord along with the shader image-resolution uniform input parameter, u_resolution.
Download
3.0-hello-gradient.fragor interact with the ShaderToy port of this shader.
Shader Output
And here is our pretty gradient:
Building a Dynamic Gradient Colur Shader
Here's a more complex shader that also plays with colour gradients but also involves the u_mouse and u_time uniforms.
Download
3.0-uniforms.fragor interact with the ShaderToy port of this shader.
Shader Output
Hover your mouse over the shader to change the rate at which it changes from a pink/blue/cyan colour scheme to a red/yellow/green scheme.
Trigonometric Rabbit Hole
🎵 Shadertime, and the living is "Ease-y". 🎵
This shader took me down a trig rabbit hole, chasing down a formula that would allow a gently transition, called an "ease", between 0.0 and 1.0 along a sinusoidal path. I used this interactive sin plot to determine the answer. Sin normally transitions between -1 and +1, so we need to divide it by 2 (now transitioning between -0.5 and 0.5) and then add 0.5 (now transitioning between 0.0 and 1.0):
This sinEase function is used to ease R & G pixel colour strength according to pixel position in both x and y, creating what looks a bit like an interference pattern. The "width" of the colour easing sinusoid is stretched out from 1% to 99% according to the shader's playback time in seconds.
The mouse's x position changes rate at which the Blue component strength eases between 0.0 and 1.0:
I'm not sure why I went with the ridiculous function of the absolute value of the tangent of the delta time for the blue easing.
Graident Shader in Unreal Engine
Here's the above blue/pink gradient shader implemented as an Unreal Engine material using their node-base language:
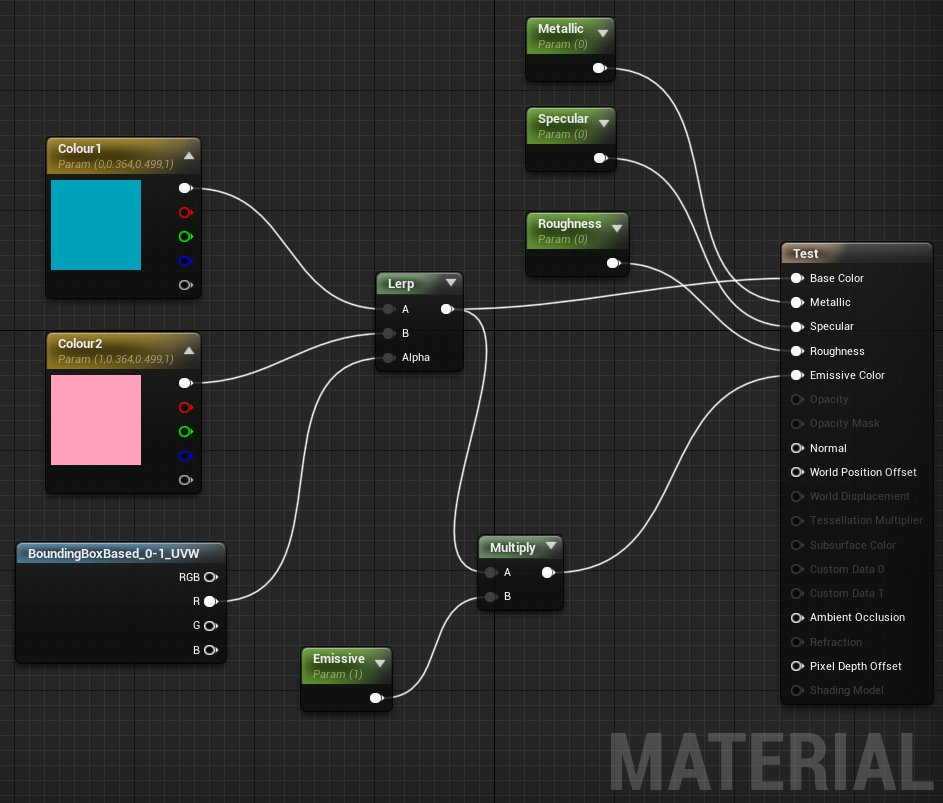
Copy these nodes to your clipboard to paste into Unreal Engine.
From "the outside" this material has percentage value (0.0 to 1.0) parameters for the material's Metallic, Specular, Roughness, and Emissive Color, properties.
In the GLSL shader the colours gradated by holding the Green and Blue component of every pixel constant (G = 36.4% intensity, B = 49.9% intensity), and changing the Red component with the x position of each pixel. The x position of the shader pixels is converted to a normalized range (0.0 to 1.0) by dividing actual x pixel position by the image resolution. From left to right the Red component of each pixels will increase from 0.0 (no red) to 1.0 (full stregth red).
In the Unreal Material I used two colour nodes, represented in Unreal as two 4D constant vectors Constant4Vector: A blue shade (0, 0.364, 0.499) and a pink shade (1, 0.364. 0.499) with full alpha for both.
The Lerp node performs linear interpolation on these two colour vectors, using the normalized x position of the material's boundingBoxBased_0-1_UVW as the position in the gradient between the two colours.
The lerpped colour is then used as the material's Base Color and is also optionally added as the material's Emissive Color. Lerping is another example of an easing function.
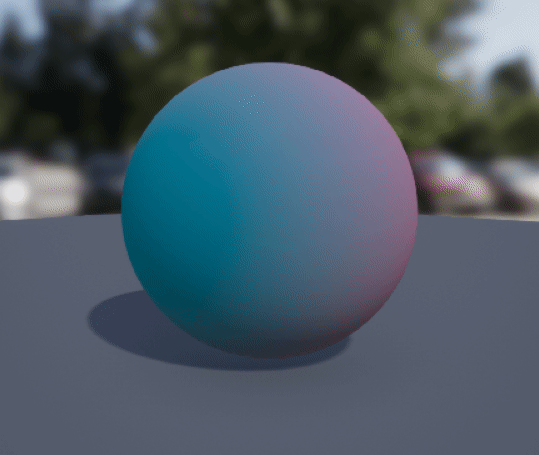
And here's a gif of this material applied to a simple sphere:
Next up we'll explore running shaders across different platforms and embedding shaders in online docs.